Flutter Boilerplate

This repository provides a boilerplate source code to streamline the initial setup of new Flutter projects. Developed by moshafDEV, it ensures consistency, scalability, and adherence to best practices through Clean Architecture principles.
Features
- Clean Architecture structure for maintainability and scalability
- Modular codebase for rapid development
- Pre-configured assets and essential directories
- Ready-to-use templates for common features
- Integrated support for multiple environments using
flutter_flavor - State management with
flutter_bloc - Dependency injection via
get_it - Networking powered by
dio - Local storage setup with
flutter_secure_storage - Routing handled by
go_router - Linting and code quality enforced with
flutter_lints - Unit and widget testing configuration
- Customizable theme and localization support
- Error handling and logging modules
- Analytics integration for screen tracking
- Example implementation for authentication (login/profile)
- Separation of data, domain, and presentation layers
- Configurable environment variables and DI modules
Installation Guide
Follow these steps to install moshaf_boilerplate globally using Dart Pub:
-
Install Dart SDK
Ensure Dart SDK is installed on your system.
Refer to the official guide: dart.dev/get-dart. -
Open Terminal or Command Prompt
Use your preferred terminal (Linux/Mac) or Command Prompt (Windows). -
Run Installation Command
Execute the following command to installmoshaf_boilerplateglobally:dart pub global activate moshaf_boilerplate -
Verify Installation
Confirm the installation by running:moshaf_boilerplate --helpIf help information is displayed, the installation was successful.
-
Add Dart Pub Global Path (if required)
If the command is not recognized, add Dart's global pub path to your environment variables:- Linux/Mac:
$HOME/.pub-cache/bin - Windows:
%USERPROFILE%\.pub-cache\bin
Example for Linux/Mac:
export PATH="$PATH:$HOME/.pub-cache/bin" - Linux/Mac:
Usage Guide
Once installation is complete, follow these steps to initialize your Flutter project using moshaf_boilerplate:
-
Open CLI in Your Project Directory
Navigate to the folder where you want to create your new Flutter project. -
Run the Boilerplate Creation Command
Execute the following command:moshaf_boilerplate createThis will scaffold your project with the recommended structure and templates.
Note:
After generating your project, it is highly recommended to review and customize your.gitignorefile to ensure that unnecessary files and directories are excluded from version control. This helps maintain a clean repository and prevents accidental commits of sensitive or build-related files.
Initial Setup Android and iOS Project
After generating the project using this boilerplate, complete the following additional steps to ensure the application runs properly on both Android and iOS.
Android Setup
1. Configure Product Flavors
Product flavors for dev and prod have already been prepared.
You only need to adjust and use them according to your project requirements.
flavorDimensions("flavor")
productFlavors {
    create("dev") {
        dimension = "flavor"
        namespace = "com.example.example"
        applicationId = "com.example.example"
    }
    // create("prod") {
    //     dimension = "flavor"
    //     namespace = "com.moshaf.example"
    //     applicationId = "com.moshaf.example"
    // }
}
- Update the
namespaceandapplicationIdas needed. - Uncomment and configure the
prodflavor when ready for production.
3. Flavor-Based Configuration
Flavor-specific configurations have also been prepared.
You can place different configuration files such as:
google-services.jsonAndroidManifest.xml- Other environment-specific resources
Inside the following directories:
android/app/src/dev
android/app/src/prod
This allows you to:
- Use different Firebase / Google Services configurations
- Separate AndroidManifest settings for dev and prod
- Manage environment-specific resources cleanly
iOS Setup
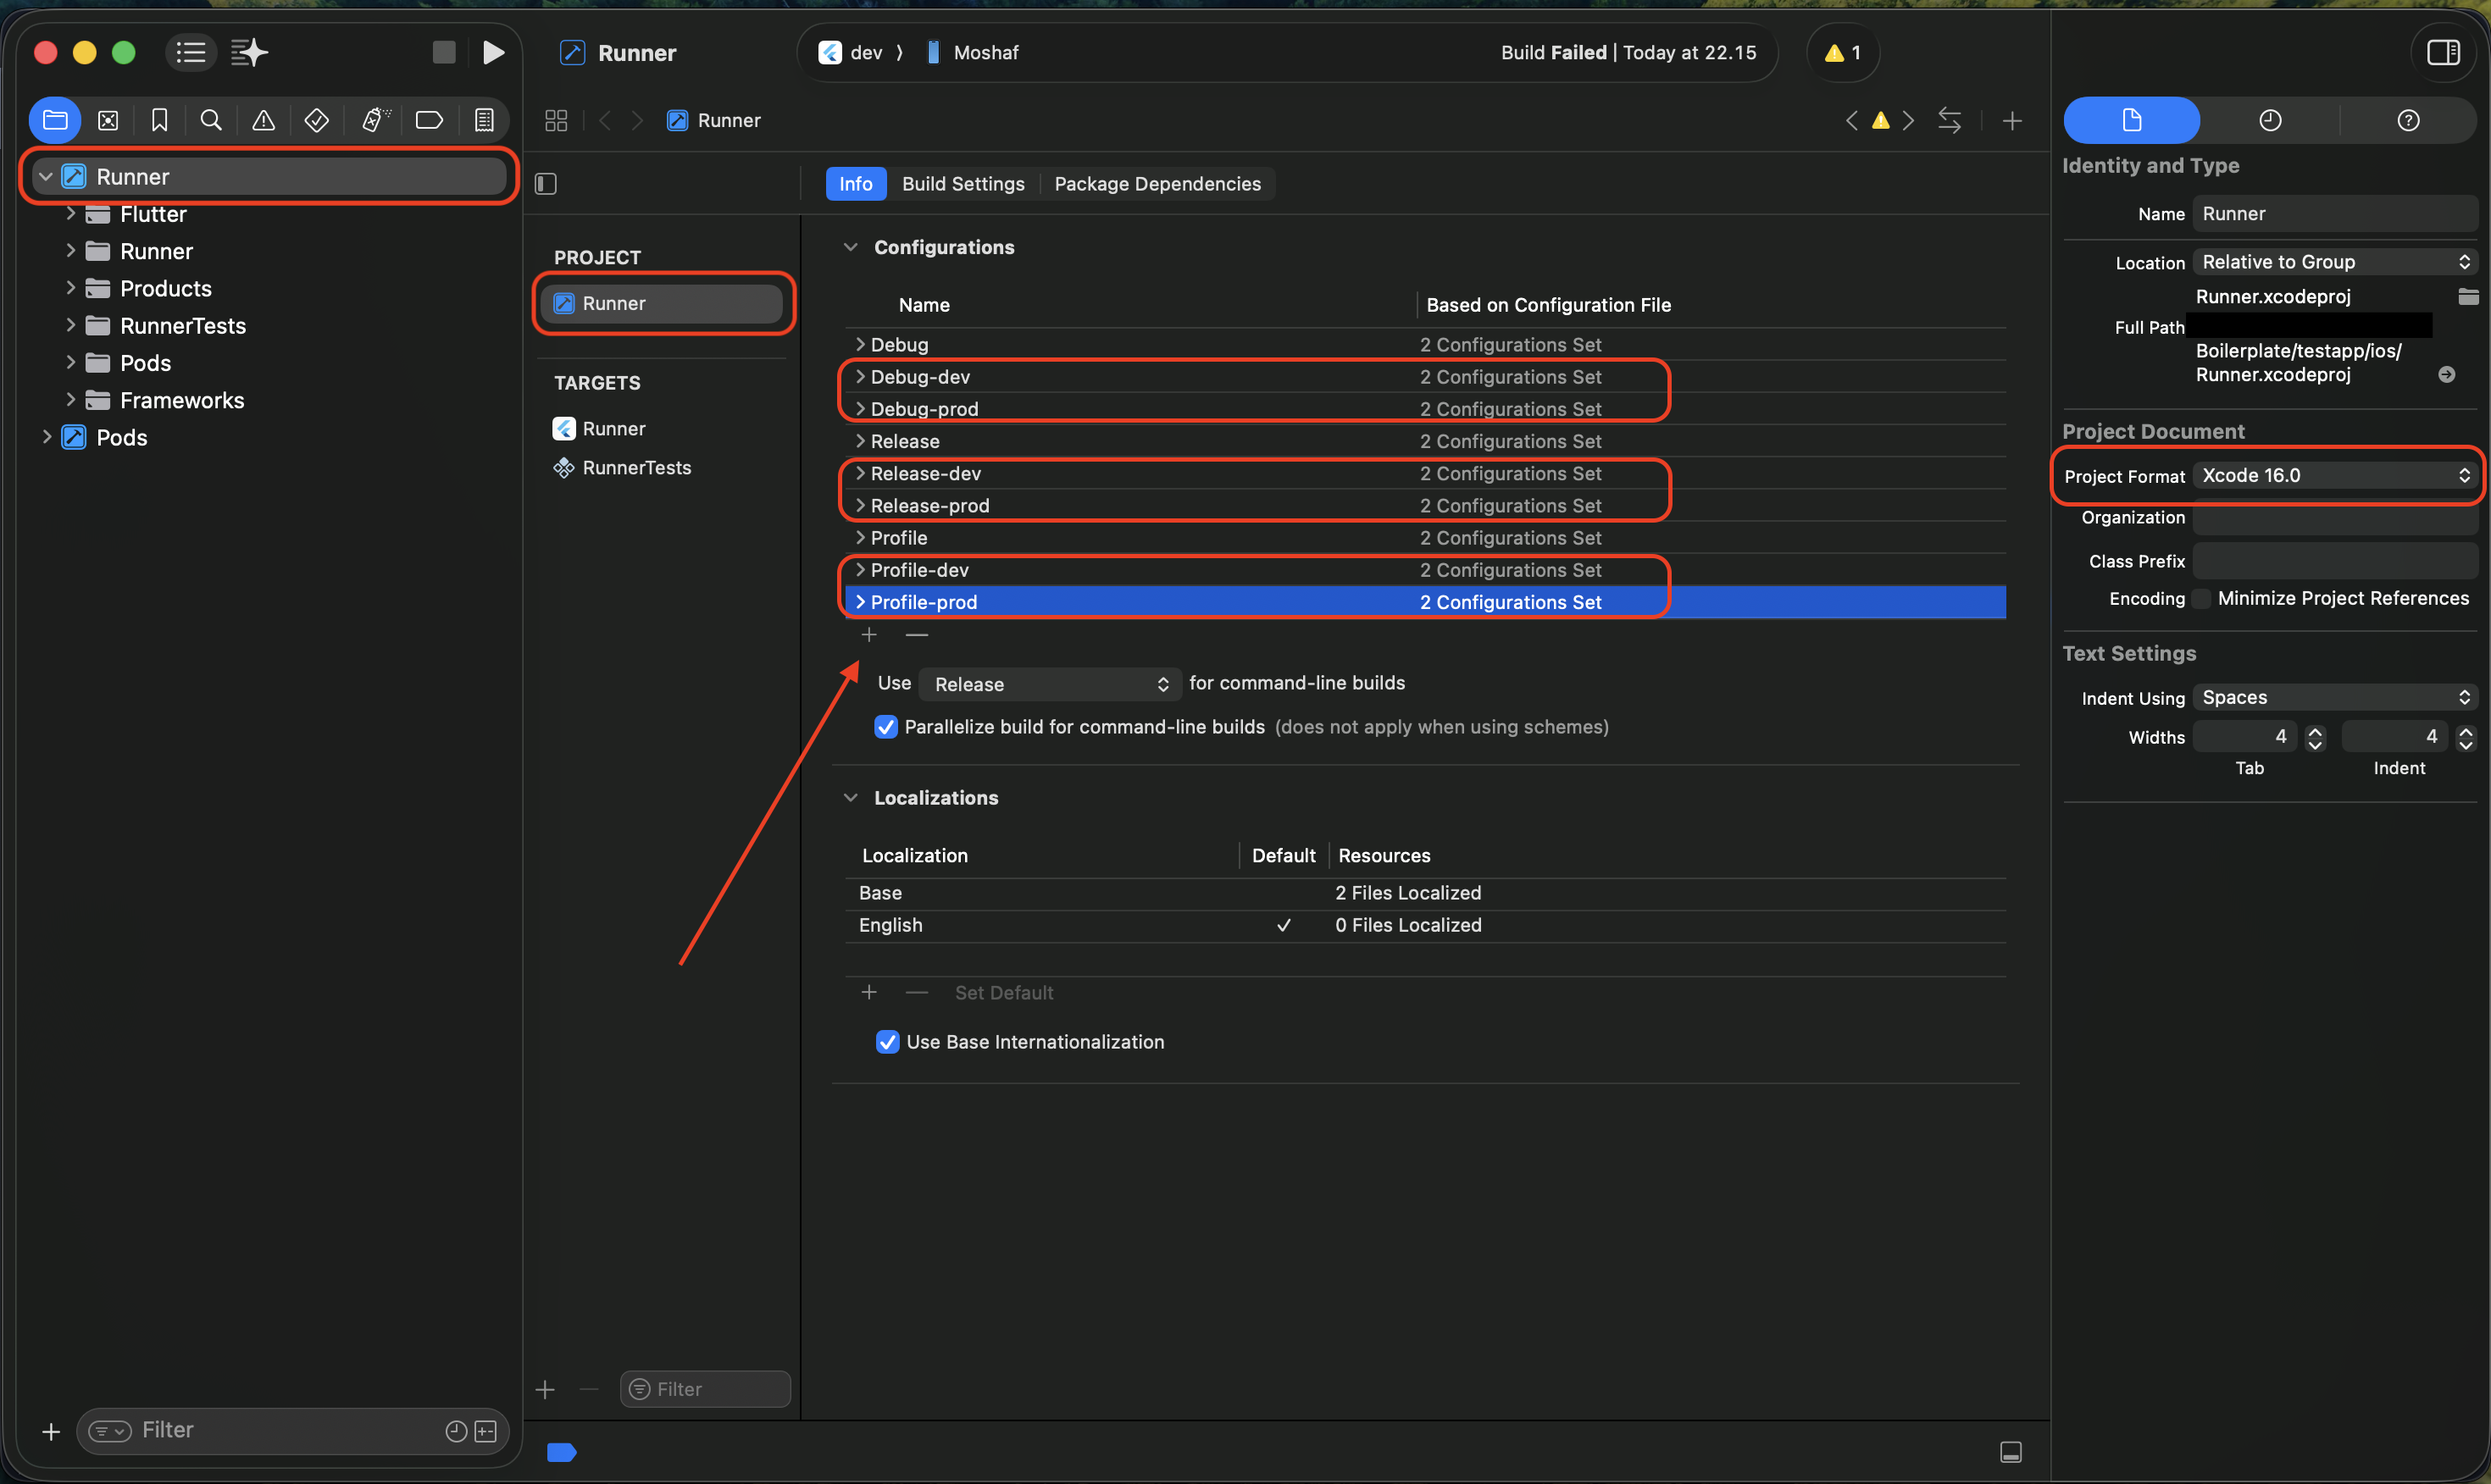
1. Add configurations project
- Open the project in Xcode.
- Select Runner from the sidebar and select Project Runner from the navigator.
- Click the "+" button to add a new configuration and duplicate from each existing configuration.
- Add the configurations as shown in the capture below:
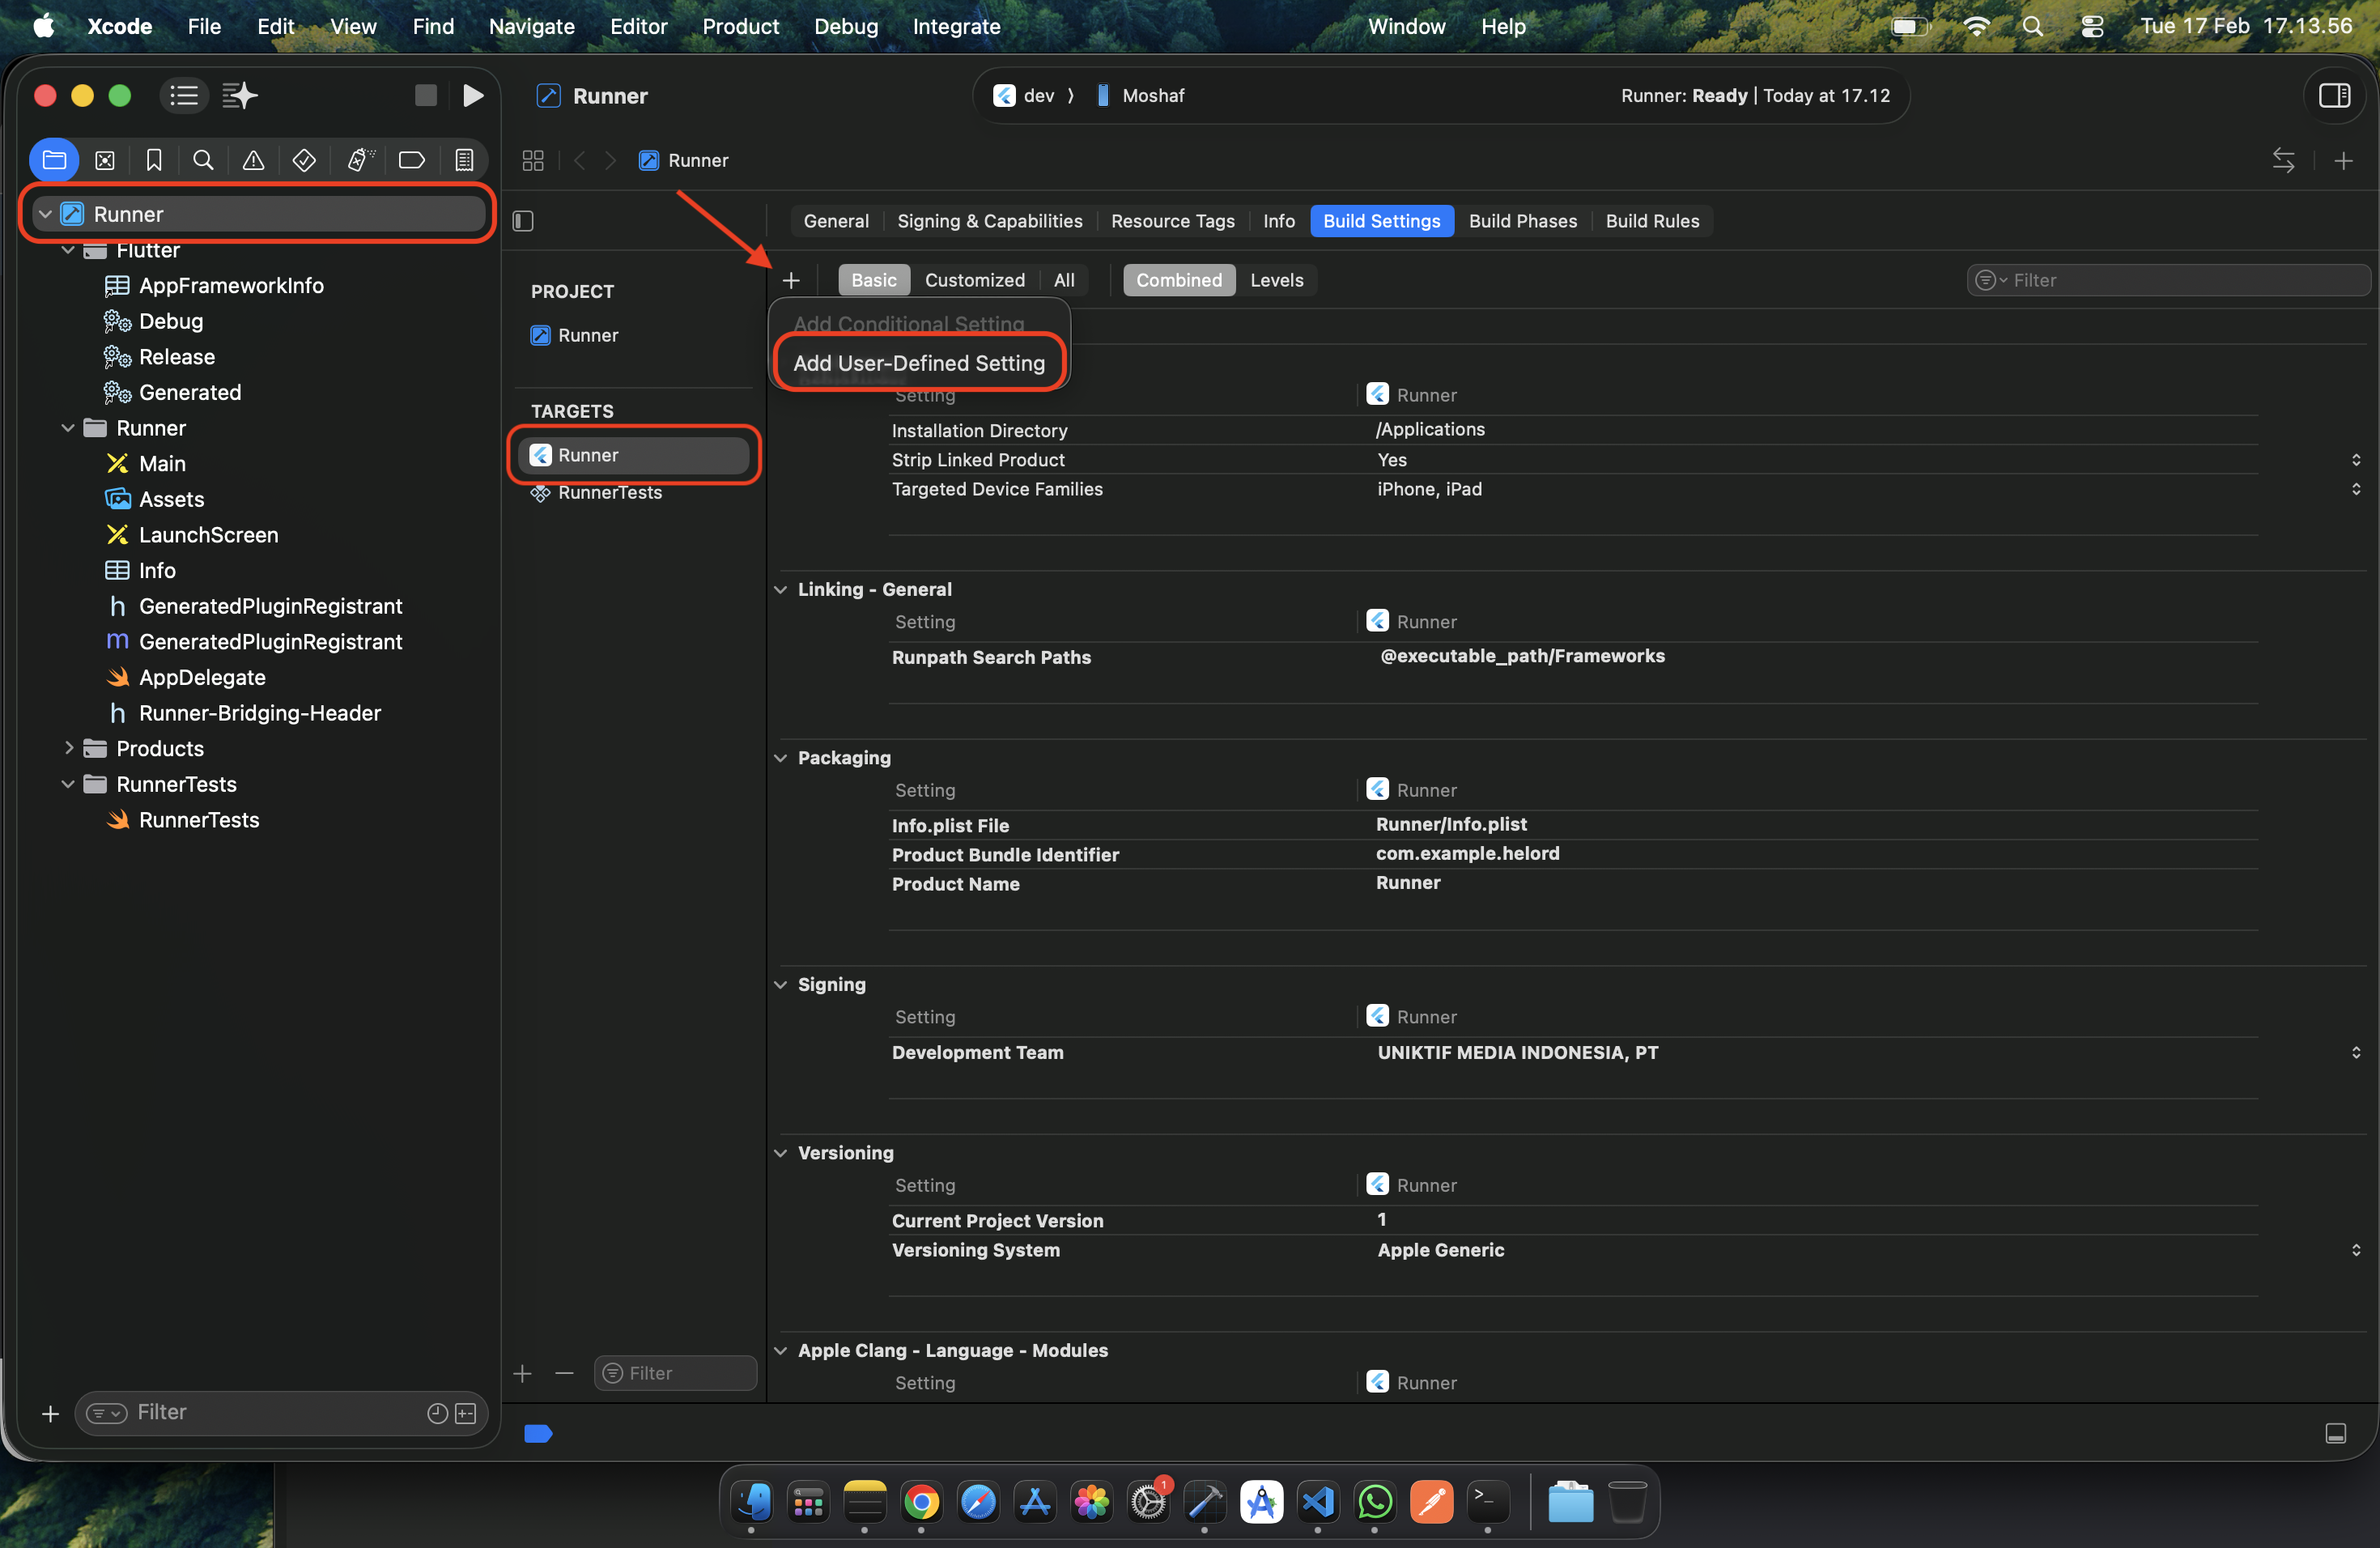
2. Add FLAVOR Parameter
- Open the project in Xcode.
- Select Runner from the project navigator.
- Go to the Build Settings tab.
- Scroll to User-Defined Settings.
- Add a new key named:
FLAVOR
- Set the value according to your desired flavor (e.g.,
dev,prod).
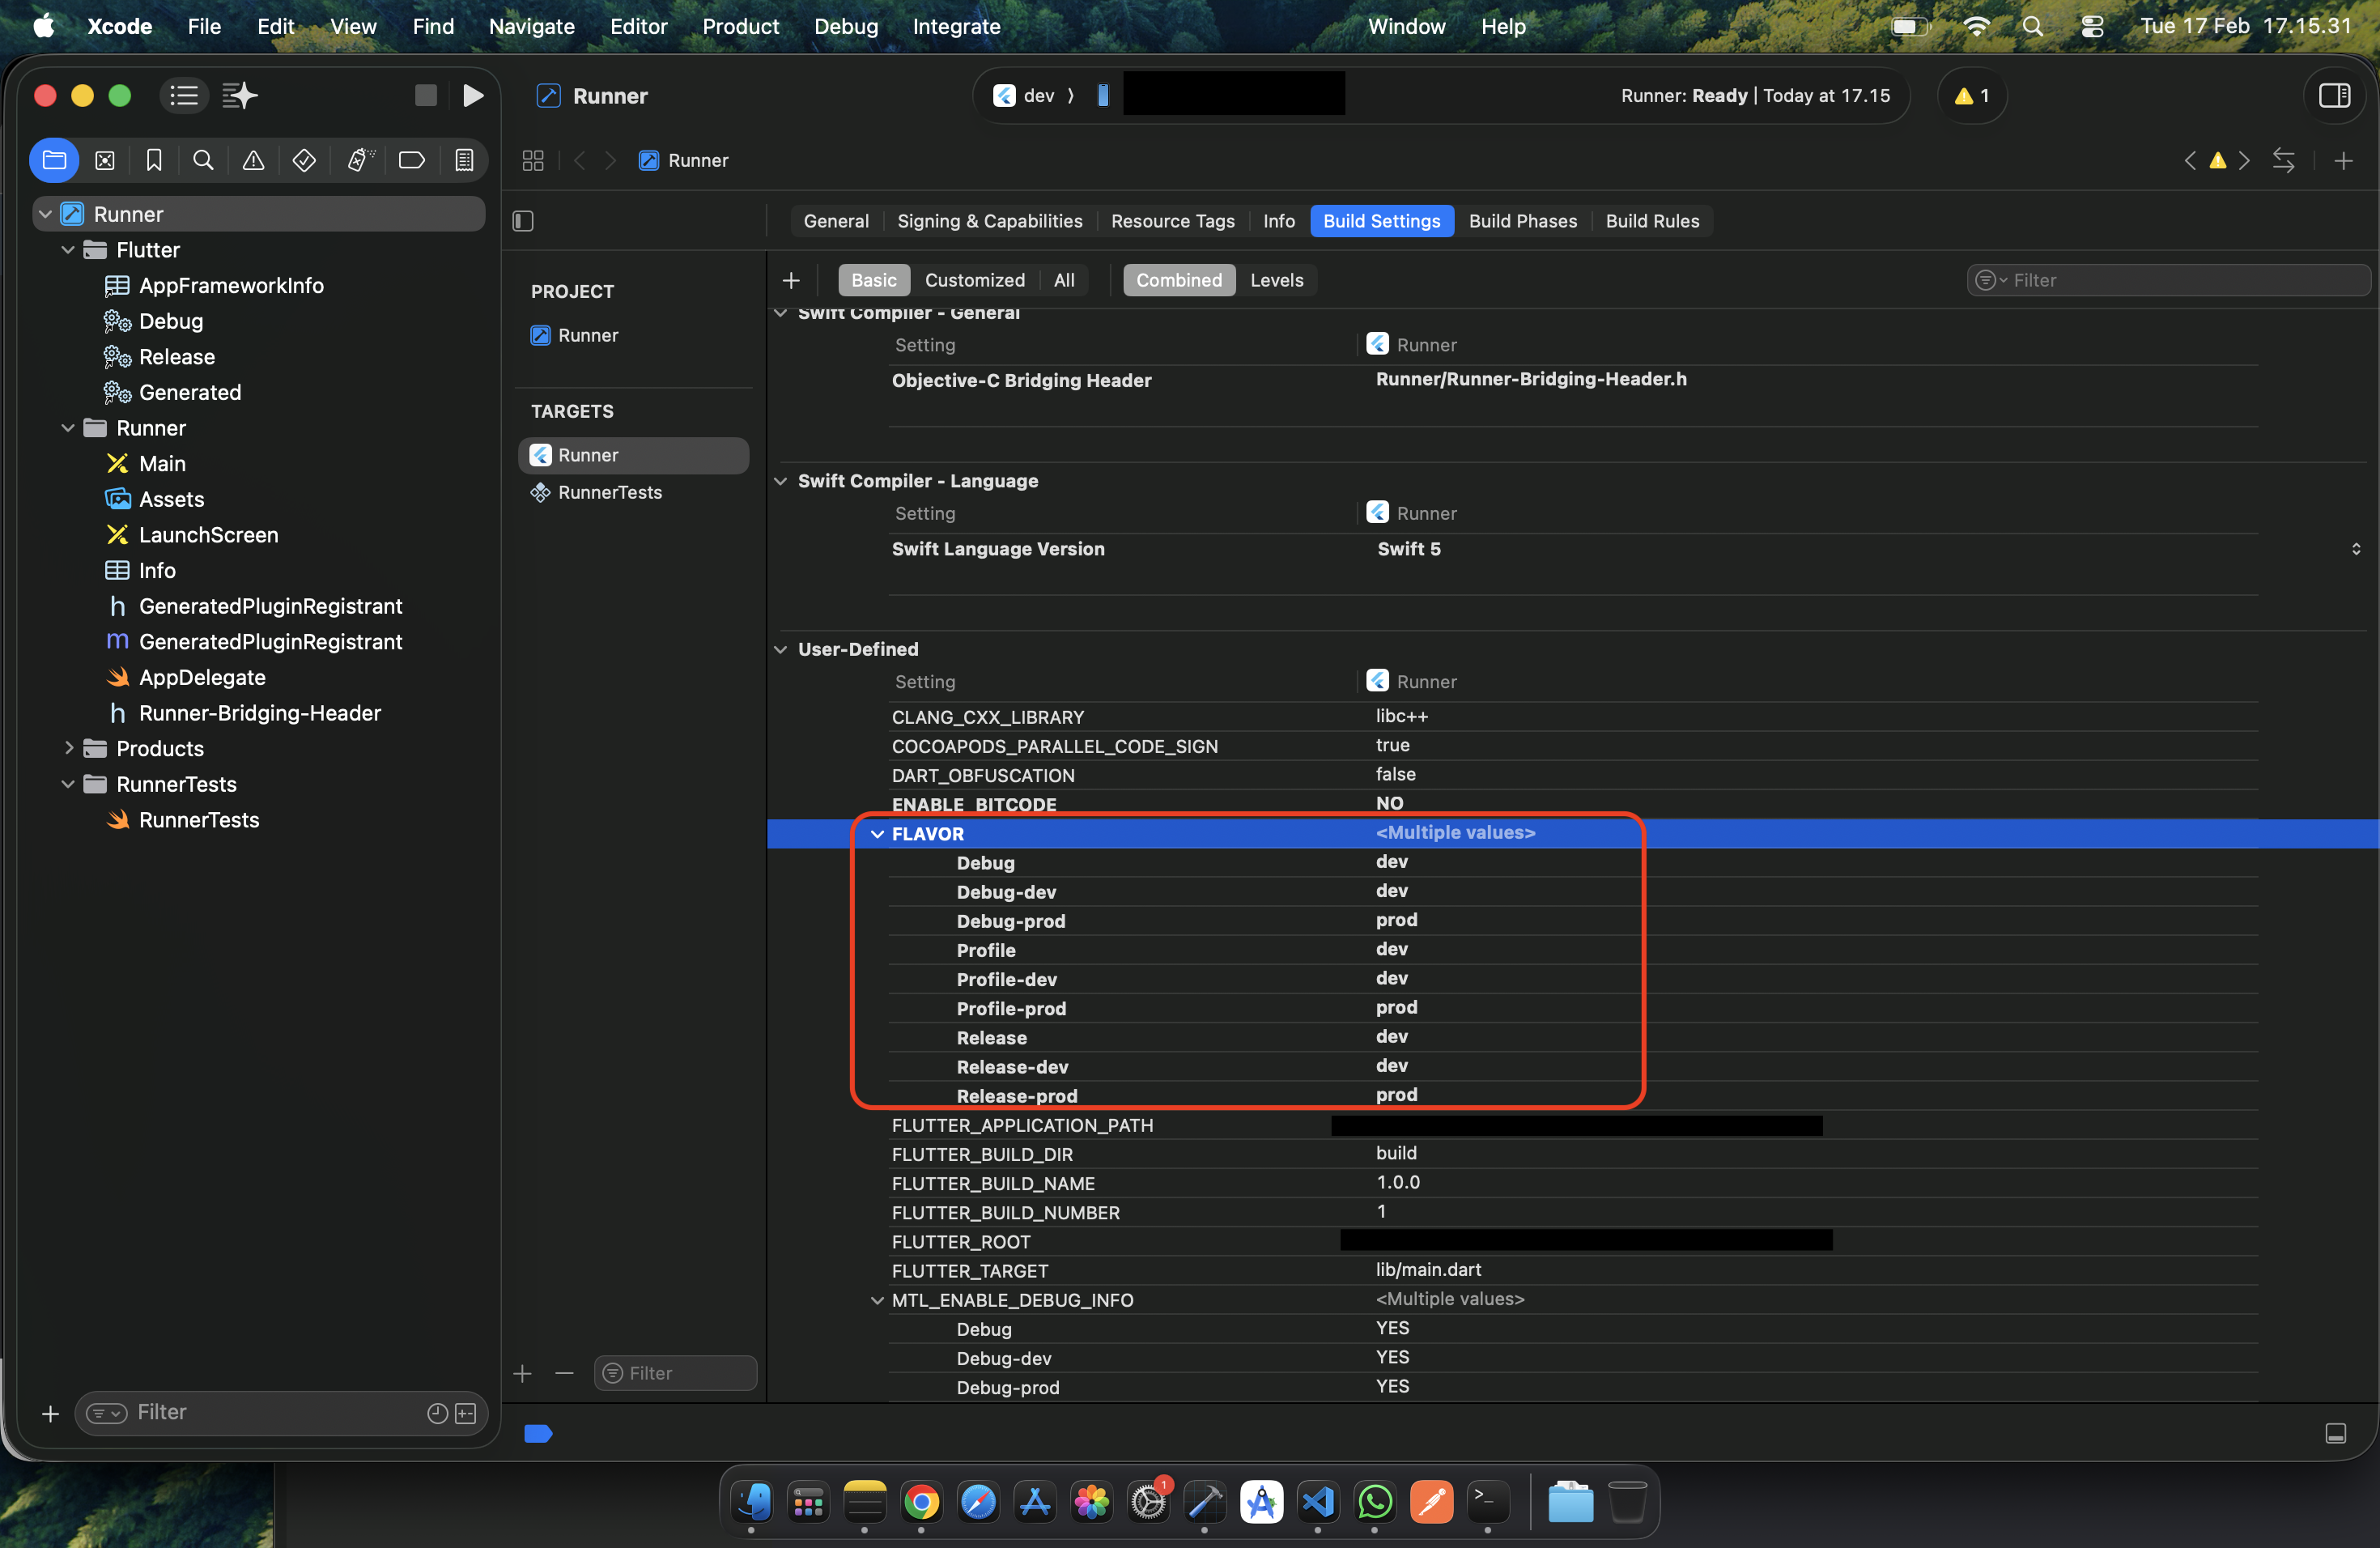
Make sure your build configurations are properly mapped to each flavor if you are using multiple environments.
Example
3. Configure Info.plist and Google Service per Flavor
You can configure environment-specific settings directly in Xcode via Build Settings.
Info.plist Configuration
- Open Runner in Xcode.
- Go to the Build Settings tab.
- Search for:
Packaging > Info.plist File
- Set different
Info.plistpaths for each build configuration (e.g., Dev and Prod).
Example:
ios/config/dev/Info.plist
ios/config/prod/Info.plist
This allows you to:
- Customize bundle name
- Configure URL schemes
- Set environment-specific keys
GoogleService-Info.plist Configuration
To use different Firebase configurations per flavor:
- Add multiple
GoogleService-Info.plistfiles to your project (e.g., dev and prod versions). - In Xcode, go to:
Build Settings > Packaging > Product Bundle Identifier
Make sure each flavor uses a different Bundle Identifier that matches the Firebase project.
- Then configure:
Build Phases > Copy Bundle Resources
Ensure the correct GoogleService-Info.plist is included for each build configuration.
You can also manage this using separate build configurations and target memberships.
This setup allows you to:
- Use different Firebase projects (dev & prod)
- Separate environment configurations cleanly
- Avoid manual file swapping before build
Directory Structure Overview
Note: The following diagram illustrates the recommended folder structure, demonstrating clear separation of concerns in accordance with Clean Architecture.
├── assets
│   ├── fonts
│   ├── images
│   ├── svg
│   └── translations
├── build.yaml
├── config.json
├── lib
│   ├── app.dart
│   ├── core
│   │   ├── analytics
│   │   │   └── screen_analytics
│   │   ├── config
│   │   │   ├── di_module
│   │   │   └── loggers
│   │   ├── constants
│   │   ├── env
│   │   ├── error
│   │   ├── http_client
│   │   │   ├── interceptors
│   │   ├── routes
│   │   ├── services
│   │   └── utils
│   ├── data
│   │   ├── datasources
│   │   │   ├── local
│   │   │   └── remote
│   │   ├── models
│   │   │   ├── login
│   │   │   │   ├── request
│   │   │   │   └── response
│   │   │   └── profile
│   │   │       └── response
│   │   └── repository_impls
│   ├── domain
│   │   ├── entities
│   │   │   ├── auth
│   │   │   ├── login_param
│   │   │   ├── profile
│   │   │   └── text_input_field
│   │   ├── repositories
│   │   └── usecase
│   │       └── login
│   └── presentation
│       ├── bloc
│       │   └── login
│       ├── component
│       └── pages
│           ├── home
│           │   ├── components
│           ├── login
│           │   ├── components
│           ├── splash_screen
│           │   ├── components
│           └── welcome
│               ├── components
Recommended Versions
For best compatibility and performance, use the following versions:
-
Flutter: >= 3.32.0 Check your version:
flutter --version -
Dart: >= 3.8.0
Check your version:dart --version
Refer to the official Dart installation guide: https://dart.dev/get-dart.
After installation, ensure the Dart SDK path is added to your system's environment variables.
Example for macOS/Linux:
export PATH="$PATH:/usr/local/bin/dart"
On Windows, add the Dart SDK path (e.g., C:\tools\dart-sdk\bin) to your system's PATH variable.